
Create and design your own unique crop top.
Everyone loves getting compliments on what they are wearing. The typical reply is “thank you” and maybe where you bought it. But what if instead you could reply that you made it yourself? Although clothes can be made from fabric with a sewing machine, there are much easier projects that are just as unique. A great thing about DIY, or do-it-yourself, projects is that you can save money by making them out of your old clothes, or just buying a few supplies. I’d like to share some of these projects so you can reap these benefits and expand your summer wardrobe, with a big hit such as a crop top.
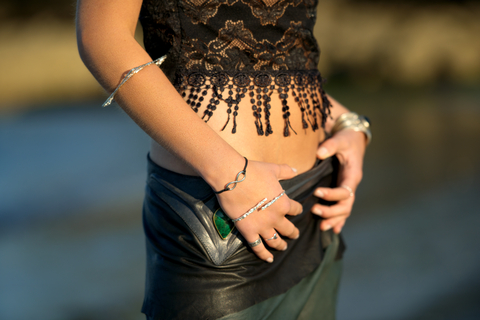
This summer, crop tops are very trendy. Most people know the trick of cutting an old shirt into a crop top, but I’d like to take it a step further. Instead of leaving the crop top as-is, there are a few ways you can spice it up. My favorite is cutting fringe at the bottom.
One of the best things about DIY projects is how customizable they are. Since you are making it, you can determine the length of the crop top and how high the fringe goes. After cutting the fringe, it looks best if you pull on them to make it look neater. This project doesn’t take long, and it gives you a shirt with a very boho-chic look, costing you almost nothing.
Another way to change the unoriginal crop top look is by creating bows in the back. There are two ways to do this: you can cut slits and scrunch up the fabric or you can attach separate fabric. For the first method, after scrunching up the fabric for a bow look, wrap fabric you cut to make the crop top around the middle to finish the bow.
The second method is a little more time-consuming, but just as easy. To start, cut a deep U-shape in the back of the shirt. Then, taking the separate fabric, scrunch it in the middle to make the bows and sew or glue them to keep their shape. After, you can glue or sew the bows onto the back of the shirt. This project takes a little longer than the fringe, but it’s worth it.
When people think of DIY clothing projects, most people think of t-shirts. However, there are also plenty of ways you can redesign denim shorts. This is a great idea because regular denim can get very unoriginal and boring after awhile. For the Fourth of July, I made a pair of American flag cutoffs. They came out really cool, and I saved money since I didn’t have to buy a pair.
To make these, I bought an American flag bandana and glued the star pattern to one side. Then, I used tape to space out the stripes by taping down the parts I didn’t want to be red. I took red paint and painted the lines without the tape to create stripes on the other side of the shorts. I made my stripes vertical so my shorts wouldn’t look exactly like a flag, but it’s all up to you. Other ideas for DIY shorts are gluing fabric to one side and keeping the other plain, bleaching and dying them or putting studs on them.
Making and designing clothes saves you a lot of money. It also gives you the ability to say you created something yourself. If you’re interested in getting started, I suggest checking out Rock Paper Scissors on 15 Bloomfield Avenue in Montclair.
Beth Rowan from Rock, Paper, Scissors also thinks designing your own clothes is a great thing. “We just love the DIY fashion movement,” said Rowan. “We are blown away by all of the creative stuff that is being made in this community.” Rock Paper Scissors sells paint, all types of fabrics and other supplies that are perfect for DIY projects.
You must be logged in to post a comment Login